So when I mentioned that I tend to go a bit off of the deep end on my projects, I wasn’t kidding. After making the initial decision to attempt to master BBQ, I realized that I would need the proper tools to accomplish my lofty goals. Yes, I’ve had lofty goals ever since I was a child.
Anyway, I spent a decent number of hours pouring over BBQ books and internet forums trying to see what all of the pros were using. I quickly realized that if I was going to proceed with any measure of success, using any sort of equipment that I could purchase outright, I would be spending thousands of dollars. Since I don’t have thousands of dollars sitting around, I did what I always do in these situations, I started trying to figure out how I could build a smoker that would perform at the same level for a fraction of the cost.
As it turns out, there are hundreds of videos, tutorials, forums, and blogs dedicated to DIY cinder block smokers and designs. These communities are all centered around cost and performance and proved to be a valuable resource for my initial design research. There were a number of different initial designs to choose from, each design comes with it’s own pros and cons. For the most part, all of these designs seem to stem from a traditional rectangular Texas-style BBQ pit in which the fire, cooking, and smoking are all done in the same chamber. However, that initial design has been meticulously improved upon over the years in a number of ways and I made sure to take note of each modification and the pros and cons associated. Eventually, I decided that I wanted to build a Reverse-Flow Cinder Block Smoker with a separate firebox. I wanted something that would allow me to have a steady temperature and a constant natural draw for good airflow.
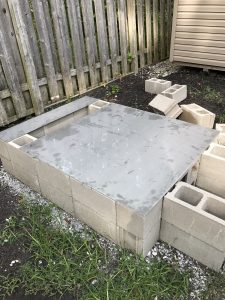
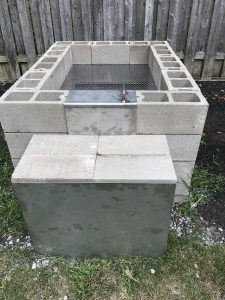
While the majority of my design utilizes standard cinderblocks available at any hardware store, I also had a couple of stainless steel pieces custom-made from a local shop. I opted for stainless because this thing is going to be out in the elements and I didn’t want it to instantly rust. I opted not to pour a concrete slab for my build. I thought that leveling the ground would be easier/cheaper. While it proved to be way cheaper, it was not easier. If you have the option, pour a slab. When I do this again, that’s what I’m going to do. If you look below, you will see a few pictures of my build without the lid. I will be using cement board as a lid to buy me time until I have a steel lid manufactured. So yeah, here’s my prototype, I’m looking forward to putting it to use!
Below you can check out some pictures of my build. Pay no attention to all of the crabgrass. I know it’s there and will be addressing it after the smoker is up and running. Priorities.